Wednesday 31 October 2012

Equivalent Fractions


Fractions are always a tricky thing to teach students and sometimes can be a hard concept for students to grasp, especially equivalent fractions. 

Again I like to teach equivalent fractions by using the concrete-pictorial-abstract approach. 

This is an activity for teaching equivalent fractions using the concrete approach to begin. In a small teacher focus group, I handed out a bunch of scrap paper to each student. 

I asked them first to fold the paper into half and shade in one half of the paper. That was easy. We left that paper alone and grabbed another sheet. I then asked the students to fold that paper into quarters. The instruction was then to shade in as many pieces of the sheet as needed to the same amount was shaded as the sheet for halves.
We repeated this activity for eighths. 

The picture on the left is the result of our little experiment. A few students soon caught on that 1/2, 2/4, and 4/8 all represent the same size and are therefore equivalent fractions. 

This was an exciting activity for me as a teacher as I didn't tell the students we were going to learn about equivalent fractions. Rather, I sat back, gave the instructions and watched the students draw their own conclusions about the paper in front of them. It was wonderful to see the "Ah-ha!" moment on their faces when they were able to make the connection. This will definitely be an activity repeated in the future.

Monday 29 October 2012

Summarising a Video Clip

I've posted before about One Dollar Sentences and how much I love that strategy for almost any subject area or topic.

Today we did a group activity on summarising and it was amazing to see the level of engagement from all the students. Students were placed in mixed ability groups and given the task to watch a brief video clip from Behind the News. While they watched the video clip, they were to jot down the key words from the clip. 


As soon as the clip ended, students were given five minutes in their groups to create a "one dollar sentence" to summarise the main idea of the video clip. Today, every word was worth five cents, thus a one dollar sentence needed to have exactly twenty words in it. Groups were awarded point for have twenty words exactly, having correct grammar and summarising the key facts. Students' competitive spirits were ignited and the race was on. 

We did this activity a few times with different video clips and it was great to see the improvement in the sentences and summarising. Some students began with summarising in two sentences and then were able to restructure their words to ensure it was only one sentence. Here are some examples:


Saturday 27 October 2012

Writing Unit Sequence

You may have noticed a bit of a pattern that I use when teaching a writing unit. I often start the units the same way, as I believe that these core lessons are utterly important in any writing genre. I thought I would give you a quick run-down on the sequence of lessons I use to start a writing unit. These are usually all taught within the first two weeks of introducing the new writing genre. 

So here we go...

Lesson 1: Writing pre-test for the genre
Lesson 2: Discovery Chart to identify features and structure of the genre


Lesson 4: Joint creation (teacher and students) of a rubric 


Lesson 5: Student evaluation of their pre-test with the rubric created by the class

Lesson 6: Student creation of own writing goals for the genre based on their self-evaluation with the rubric (this leads to the creation of a writing goals poster)


And after this is done, we begin to work more in detail on specific genre of writing. Hope this spawns some wonderful ideas for writing in your classroom!

Friday 26 October 2012

Group Editing

This is an absolutely amazing idea that was shared with me by my colleague Ryan, who is also coincidentally an amazing teacher. It can be used for any writing genre and has been used in the classrooms for grade 3 to grade 6 students. It can definitely also be used for high school students.

As you move through the writing process for a genre, use this activity for the editing and revising  stage of the writing process. 

Students are placed in mixed ability groups of approximately 4-5 students. They work together to edit each other's writing piece. The person whose work is being edited puts their work on the interactive white board and also have a copy printed for themselves. They get to sit in the "teacher chair" with a clipboard, their printed copy and a red pen for corrections. 

One of the other students is the "computer jockey" and is in charge of the whiteboard marker. The other two or three students are editors. They all sit around in a semi circle facing the interactive whiteboard. The "computer jockey" begins to read the writing piece out loud and editors can chime in whenever they think there is a correction that needs to be made. As a group, they decide how to change the error or how to revise the sentence to make it sound better. The group member whose work is being edited, then make changes on their hard copy.

The students loved this activity as they got to take greater ownership of their work and were given more responsibility and control over their learning. Some constraints may be a lack of interactive whiteboards to use. I was lucky that I have one in my room and was able to borrow a TV for another classroom to connect to. This way I could have two groups editing at the same time. While this occurred, other students were either finishing drafting, or publishing once their work was group edited. 

After the group edited the work, the group decided as a whole if the student whose work was edited achieved our writing goals. They then placed a sticky note beside the goal achieved. Most students achieved the majority of the goals and then simply had to go back to their edited draft and add in either "juice language" (descriptive language) or more technical language (so only simple revision).

I absolutely loved doing these writing sessions and the excitement of the students made it even more worth while. 

This activity is easily linked to the e5 model of instruction as students are able to evaluate their work against learning goals and can visually see their improvement and also areas for future improvement. 

This is also a very positive activity for EAL (English as an Additional Language) students in a mainstream class as they are able to receive assistance from native English speakers in a non-intimidating setting and environment since all students are editing each others work.

Wednesday 24 October 2012

Are you a Square?

I found this activity from New Zealand Maths and thought that my students might enjoy it as they love hands-on activities. It is called "Are you a Square" and is used for estimation and measurement of length and height. 

Students predict whether their body shape is landscape, portrait or square, based on their height and the measurement of their arms spanned out.

I modelled the activity to the students and then they were given the sheet to record their estimations and actual measurements.


First thing they had to do was make estimations. Then, they were to work with the students at their table to measure each others arm span and height with a piece of string first. Next they used the measuring tape to measure the length of the ribbon and get their accurate measurements. 

This activity took a whole one hour maths lesson and students stayed engaged throughout the whole session. One again, another hands-on maths activity that engaged students and allowed them to develop their estimation and measurement skills. 

This activity relates to the e5 model of instruction as it engages the students and allows them to explore this maths unit through an activity using concrete materials.


Tuesday 23 October 2012

Fractions with Smarties


Once again when teaching in maths, I love working with concrete materials!!! They allow students to work hands-on with their learning and grasp a concept more easily than just trying to understand it on paper.

To begin our unit on fractions, I had students do an investigation with Smarties. Geeze, they were excited about that!

Students were placed into groups and given a package of Smarties. They then had to find the fractions of each colour in the box. 

For example: The fraction of red Smarties in the box is 5/40. 

I gave very little instruction to the students other than telling them they needed to find the fractions of each colour. This worked well as I was able to rove around and see the different strategies students used to find their fractions. Some groups sorted all the Smarties into each colour first, while others counted the total number of Smarties first. This was definitely an exciting investigation for the children but also a good diagnostic to see who grasped the concept of fractions.

Monday 22 October 2012

Sharing in Division

The classic banana sharing activity! I have used this to teach division multiple times. When teaching any of the number operations (addition, subtraction, multiplication, division), I try to make sure that I am teaching the students many different strategies that they can use to solve equations. 


For basic division, the main strategies I teach are: sharing, inverse operations, and chunking/splitting. I always start with sharing as it is the simplest and most basic way to explain division. This activity is a concrete approach to teaching the sharing strategy.

Each student is given a worded division problem and pictures of bananas as their counters. They need to solve the problem by sharing their bananas between the amount of people in their problem to show how many bananas each person receives. 

In this example, the problem is the following:  
"There are 20 bananas in a bunch. Two people will share them. How many bananas will each person receive?"

This student cut out the twenty bananas from their bunch and split them between the two people to solve the problem. Although this seems like a very simple task, it is a great introduction into division and is an easy way for you, as a teacher, to identify whether the students in your class understand the concept of division through sharing. 


Sunday 21 October 2012

One Dollar Sentences

A short one but a good one!

I learnt about this while I was in teacher's college as a strategy to help students explain an idea/concept/etc. in a short sentence. I've used this strategy in high school and now I often use it in primary school and students find it exciting and a challenge. 

It is called a $1 sentence and each word is worth 10 cents. Students are asked to respond to a question or summarise a passage in a one dollar sentence (ten words only!). 

Try it out!!! Trust me it is wonderful!

Probability Stations

A fun and exciting way to teach probability in maths. I ran a station activity with the students where they had to rotate and complete a sheet at each station using a different type of concrete material.

 Station #1: Conducting an experiment with a spinner.


Station #2:  Using a deck of cards to answer probability questions.

*Be sure to include an info sheet on cards i.e. 52 cards in a desk, 26 red cards (13 diamonds, 13 hearts), 26 black cards (13 spades, 13 clubs), each suit has the cards 1-10, Jack, Queen, King and Ace.


Station #3: Answering probability questions about a spinner with numbers and colours. 


Station #4:  Using marbles and dice to solve probability questions.

Saturday 20 October 2012

Possible Sentences

I learnt about this activity in a PD I went to on teaching EAL (English as an Additional Language) students. It is called possible sentences and can be used in reading and writing and also can be modified to be used across all year levels. 

It must be used on a familiar topic but it is a great way to introduce new vocabulary to the students. My example is on London and I have used information from Microsoft Encarta to create the example. 

Students are given a sheet (or place this on the IWB) that looks like the following:

LONDON


1.       capital city, United Kingdom
2.       largest city, Europe
3.       population, 8 million people
4.       the Queen, lives, Buckingham Palace
5.       Westminster Abbey, famous church
6.       transportation, the Tube, double-decker buses

     Only the key words are provided to the students. Their challenge is to put together a sentence using the exact words on each line. So they will essentially build a paragraph of six sentences based on this example and in sentence one, the must use the words "capital city" and "United Kingdom". 

     My students really enjoyed this activity and I've used it to teach new vocabulary, to focus on an area of grammar (such as past tense or writing consistently in a tense) and to model what a paragraph should look like for a writing style.

    If you find this activity is to easy for some students, you can challenge them by stating that their sentence must start with a particular word. For example, a sentence I would make for line one is: The capital city of the United Kingdom is London. But, if I challenge the students and state that they must start the sentence with the word "United Kingdom", it forces students to change their sentence structure and add in more words to something like this: United Kingdom is a collection of countries, yet, the capital city is located in London, England.

     This can also be used at the younger levels by helping students create a sentence by giving them the key vocabulary to use, rather than a paragraph. An EAL strategy but also so useful for language development in native English speakers!

Sunday 14 October 2012

Sculpting

This is an EAL (English as an Additional Language) strategy that I learnt about at a PD by Margery Hertzberg. The name of this activity is "Sculpting" and is a great way to assess whether your students have understood a concept, storyline, definition or idea. Hence, there are a number of ways that you can use this activity. 

I used this in my reading class as a way of students showing their understanding of a new word we learnt that week. The focus in the class that week was making meaning of unfamiliar words.

Teammates sharing a high five after a win with an excited commentator and spectator on the side.

For this activity, students had two minutes in their groups to create (sculpt) a still frame image  to represent to word "commentator" as that was a new word we learnt. I was sooooo impressed with the creativity of the students and all the different ideas they came up with for their image.I've covered their faces for privacy, but the facial expressions added to their images also.

This was a great way for EAL students to show their understanding of a new word. Sometimes they are not always able to verbalise their understandings, thus this activity allows these students to show their understandings in a creative way still proves their learning. This can also be an oral language activity as students need to communicate with their group members to create their sculpture.

A running race with a spectator and commentator on the sidelines.

A basketball game with a commentator on the side of the court.

A ballet performance with a host commentator.


Thursday 11 October 2012

Ordering Fractions

In teaching maths, I find one of the best ways that students learn is through hands-on activities. 

"Concrete - Pictorial - Abstract" Approach to Maths 

Read this book by David Sousa to learn more about this approach. Essentially, the approach takes a unit of math and argues that students learn best by starting with working with concrete materials, moving to then using the strategy with a pictorial representation and finally moving to abstract problem.

This website has a wonderful example of this approach: http://www.loganschools.org/mathframework/CPA.pdf

The example is working with a worded problem relating to money.
Concrete: Students use play money to solve the problem.
Pictorial: Drawing out the problem with images of the money.
Abstract: Using the number operations to solve the problem.

So when I was teaching "ordering fractions with like denominators" to my class, I began with the concrete (using fraction pieces) and then moved to the pictorial (using flash cards). I combined concrete and pictorial by giving students a fraction flash card and having them arrange themselves to create a number line of fractions with the same denominator. Students were not allowed to speak to each other when arranging themselves so it ensured that the students all used their own knowledge to understand ordering of fractions. Having students move around to represent fractions is an excellent way of keeping students engaged and showing clear representations of fractions. It also allows students to stretch and have a change of pace from sitting down for an activity.


 For more information on the Concrete-Pictorial-Abstract approach, please read the following:
http://www.loganschools.org/mathframework/CPA.pdf
http://www.k8accesscenter.org/training_resources/CRA_Instructional_Approach.asp
http://fcit.usf.edu/mathvids/strategies/cra.html


Tuesday 9 October 2012

Creating a Pie Chart with Sentence Strips

Our data...a little blurry from the IWB.
Pie charts... where do I begin? I find them very difficult to teach to children as they often understand and can analyse them, but struggle to create them. 

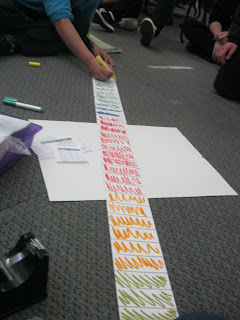
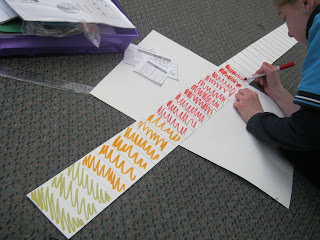
I tried this idea recently with my maths class for creating a pie chart. We used sentence strips to create a pie chart. For our example, it worked out that we were teaching fractions and graphing simultaneously and so we used data from our "Smarties" fractions activity to create a pie chart to represent that data.

The total number of Smarties was 40, so we began by dividing our sentence strip into 40 even pieces. Each piece was the width of our ruler.

Next, we coloured in the amount of each part of the pie chart. Thus, three pieces of the sentence strip were coloured brown to represent the three brown Smarties, six pieces coloured orange to represent the orange Smarties and so on.

The next step was to create our pie chart by putting the ends of the sentence strip together. The smaller the sentence strip, the easier this is so we had to get a little creative to keep the ends together.
Once the ends were together, we place our circle onto paper to trace our pie chart.
And finally, we used a ruler to create the divisions of the pie chart on our paper. A fun and creative way to create a pie chart! This is also a concrete way of creating pie charts. Following the Concrete-Pictorial-Abstract theory, we then moved on to creating pie charts on paper and then abstractly.


Sunday 7 October 2012

One More Term

My blog has been on a bit of a hiatus lately as I have been on holidays. For those of you in other parts of the world, let me explain how the Australian school year works (I had to get used to the change too!).

The school year starts right at the beginning of February and goes until the end of December/Christmas. It is divided into 4 terms with a break in between each term. 

Term 1 - February & March 
***Two week break***

Term 2 - Mid-April to End of June
***Two week break***

Term 3 - Mid-July to End of September
***Two week break***

Term 4 - Mid-October to Christmas

***** Five/six week break until the next school year*****

A little different then at home in Canada... actually very different. But it is definitely enjoyable to count down the weeks until your next holiday break. And the two week breaks are great to refresh and renew. Also wonderful for short traveling, which is what I did over this break. After a quick trip to Teacher Games , my partner (who is also a teacher) and I went to the absolutely beautiful Sydney!


And tomorrow we are back to work for one more term in the 2012 school year. Bring on Term 4!

Tuesday 2 October 2012

Boy Overboard

This is a book I just finished reading to my class and they absolutely loved. It is a Morris Gleitzman book so it included lots of humour. I was a little apprehensive to read this story as it is about a family of refugees from Afghanistan that are trying to immigrate to Australia. Many of the students in my class share similar stories to the main characters in the book, hence I wasn't sure if it would evoke any negative feelings with the students. 

Instead it had an opposite effect and students were able to have a greater understanding of the characters and their backgrounds. This is a great book for creating an inclusive curriculum in your classroom. It is also quite an enjoyable read for adults too!

Monday 1 October 2012

What I Know About...

This was an excellent way to start off our unit on graphing but can be used for basically any topic you would like.

Students formed into a circle and the only material I needed was a soft toss ball. I started by tossing the ball to a random student and they had three seconds to share one thing they knew about graphs. After stating their fact, they toss the ball to the next student and so on. If a student could not state a fact within the three seconds, they sat down. We continued to toss the ball until there were only two students standing up. 

Such a simple concept but the students loved it. As you know, their competitive side often comes out in games in the classroom. We must of come up with over thirty different facts about graphing in this game. 

Next time we play, I will use this to form a class K-W-L chart for the unit. Rather than doing a brainstorm session on the carpet to fill in the "What I Know" section, we will play the game and have a student (or myself) record all the facts stated by the students to then be placed in that section of the K-W-L chart. 

This is also a wonderful EAL strategy to use in a maths classroom. The best way to help students develop their knowledge of the English language is through oral language. We often struggle or forget to focus on vocabulary in maths, thus this game allows students to verbally express their ideas and have exposure to vocabulary specific to the unit in focus. 

Please let me know how you can use this and/or modify it in your classrooms.